
SplinePatch generates surfaces from three or four splines. It is designed as an object generator and works fully parametric.
The MultiPatch welds several Spline Patches to one smooth surface and rounds outer edges with an editable profile.
The new SplineCage object creates and manages all connections between the splines of a cage and generates all desired surfaces with just one mouse click.
Why do you need Spline Patches?
Patch-modeling is a method mainly used for modeling curved surfaces true to dimension and size. When working with car-modeling one will inevitably find this rather easy-to-use, yet powerful technique extremely useful. Nearly all tutorials dealing with car-modeling on the internet treat SplinePatches, with the exception of those designed specifically for Cinema 4D. Until now, this technique was not available for users of this otherwise very powerful 3D-software by Maxon. The Cinema-4D nurbs like “loft”, “lathe” and “sweep” do not offer sufficient alternatives. There is hardly an alternative to patch-modeling besides working directly with points and polygons.
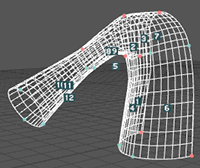
Despite this efficient technique there is enough work left to do. Most of which is connected with making splines which lead along characteristic shaping lines. Therefore, you generally use dimensional drawings, so-called blueprints, of the object to be modelled. By and by a cage of lines, a spline-cage, developes which defines the shape of the object. Between these lines surfaces can be spanned with three or four splines with their intersection points as limitations.
The SplinePatch functions of most available applications require precisely determined intersection points in the space, which are created using supplementary functions for welding the splines. Our plugin is quite tolerant in this respect. Just take note that the splines come rather close at the corner points of the SplinePatch to be created.
SplinePatches with Cinema 4D
SplinePatch provides users of C4D with a patch-modeling function. It adds to the list of C4D’s nurbs objects and works in a quite similar manner. Drag and drop three or four splines that surround the surface to be created in the SplinePatch object and choose the number of subdivisions. That’s it!
When the number of subdivisions is set, many programs proceed with generating a polygon mesh, which you can work on with certain tools. This method does not correspond to the non-modal style of Cinema 4D so we decided to conceive our plugin as an object generator. The benefit is obvious: you can change every parameter anytime, including shape and position of the splines!
Here, the actual patch-modeling would be finished.
SplinePatch offers some more features that might please the patch-modeling fan:
Stitching
This technique makes it possible to sew or weld several surfaces together in order to get a single smooth shape. Just group the SplinePatches you want to combine under a multi-patch. All patches will then be seamlessly welded together and smoothed, even if they are subdivided in a different way.
Edge profiles
It is possible to provide the edges of a multi patch with various profiles. For example, in combination with HyperNURBS you are able to create the nicely rounded edges that are typical of the seams you can find on the body of a car. You can even set the gap width! If you are working without HyperNURBS it is possible to get rounded edges by setting a bevel value.
Deforming
The shape of a surface can be changed using either one more spline or a polygon object. But you can do more than just create dents, as the term “deforming” indicates. Moreover, it is possible to bring the surface entirely or partly to a greater or lesser extent into a certain shape. Thus, for example, you can stamp something into the surface or smooth a bulge.
A single object
If you prefer working with a "real" polygon object, for example, if you want to provide a car with door handles, you can generate a clean polygon object by using the Cinema 4D functions "Make Editable" or "Current State to Object" at any time.



Tri-Patches
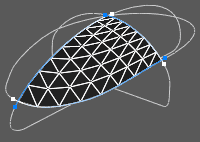
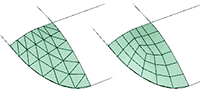
Now a SplinePatch can be created also from three splines. Tri-patches are build with triangles, in order to get a most consistent polygon spreading. Using quadrangles, the polygon mesh would converge to one corner, what may cause ugly creases.
Patch Creator
The so called comfort selection of version 1.1 was replaced by a new tool. With the Patch Creator you can create SplinePatches with just one mouse click. If you move the cursor into an area that is surrounded by three or four splines, a preview of the possible surface will be displayed. If you click, a SplinePatch object will be created using instances of the selected splines.
More control of the grid structure
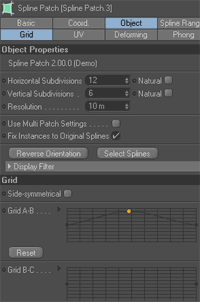
Using graphes you can control the spreading of points on each edge of the SplinePatch. Thus, you are able to increase subdivisions for regions, that require a higher resolution without having to increase the number of subdivisions for the whole patch object.
Active spline ranges
SplinePatch 2.0 can now handle closed spline objects. When using closed splines, there are often several potentialities to build a surface. Spline ranges are used, to limit the valid range of a spline in order to get the desired surface patch. You may edit the ranges in the attribute manager or directly inside the editor view by dragging the handles on both sides of the ranges.
Edge profiles
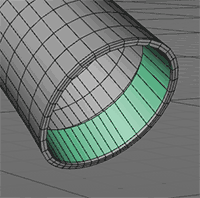
Edge profiles cannot be edited for each single SplinePatch any more, but belong now to the parameters of the multi patch object. This way of proceeding has shown up more efficiency to the workflow and ensures that the edges of two neighbouring patches can be welded without any problems. The edge profiles are now added after stitching the single SplinePatches. This way, you'll get nice smooth surface elements. The edges of the multi patch will be automatically divided into numbered segments, for which you can switch on and off the selected edge profile.
In addition to the already known L and U profiles from version 1.1, you may now define custom profiles using spline objects.
Further improvements
The algorithm for calculating the surface works faster now and provides more consistent polygon meshes.
Selected SplinePatch objects are optionally displayed with additional informations. The corner points are labeled by the letters A, B, C and D to simplify the orientation when editing parameters that refer to specific edges or corner points. The orientation of the surface is displayed by a yellow line and the active spline ranges are drawn with the colour gradient that CINEMA 4D uses for splines in the point edit mode.
Indeed the orientation of a SplinePatch still bases on the order of it's assigned spline objects, but you don't need to care about that any more. If you call the plugin with three or four selected spline objects or if you create a SplinePatch using the Patch Creator, the splines (resp. their instances) will be ordered automatically in the right way. The orientation can be flipped by clicking on the "Reverse Orientation" button.
It's now possible to overwrite the settings for the number and the type of subdivisions of each SplinePatch lying in a multi patch by defining these parameters in the multi patch settings. All SplinePatches, that have the "Use Multi Patch Settings" option enabled, will take the parameters from the multi patch object. You can enable this option for all SplinePatches with just one mouse click.




Inner edges
Also the inlying edges of the SplinePatches that are connected by a multi patch can be edited now. You can bring out these inner edges by breaking the phong shading or by beveling.
Cut-outs
You can define cut-outs using a closed spline object. Several modeling functions, like extrusion or beveling are available to be applied to these cut-outs.
Solid extrusion
The solid extrusion is a new option for the outer edge profiles. With this a completely closed object will be generated, that can be assigned e.g. a transparent material.
Corner profiles
Up to now corner profiles were inserted automatically at the corners of the edge profiles, if the corner was also a polygon corner. Now you can control this behaviour by defining a threshold angle. Additionally, inner corners are included. Corner profiles serve as a controller for the roundings of HyperNURBS.
Horizontal and vertical offset
The former parameter "gap", that was used to define the distance of the outer edges of a multi patch to the lines of the spline, e.g. in order to realize the car-typical gaps between the components, was extended by a vertical dimension and is called now "offset". Both parameters accept also negative values.
Split patch
With this new function a SplinePatch can be devided into two patch objects along a line of the polygon mesh. The function creates a new spline object at the cutting edge and assigns an instance of it to each SplinePatch.
Further improvements and bugfixes
The stiching of the SplinePatches to a multi patch was more optimised, so that problems are eliminated, that might have occurred at the crossing points of multiple SplinePatches.
Now, spline primitives can be used for the deforming. The bug, that deformed SplinePatches were rendered undeformed in the picture viewer is fixed.
Now, the subdivisions of the subordinated SplinePatches can be controlled relatively from the patches panel of the multi patch. Thus, you can test various polygonal resolutions using a percentual slider.




SplineCage
The main new feature of version 3.0 is the new SplineCage object. Once again, it has become much faster and easier to generate patch objects. In patch modeling, all splines defining the object to be modeled, make the spline cage. The new object works as a generator and creates stable connections at the intersections of all splines of the cage. These connection points can be moved and are retained even when editing the single splines.
The preview options displays all the surface, that can be generated from the cage. With a click, real patch objects are created, optionally subordinated to a MultiPatch object.
Tri-Patch from quadrangles
There are some reasons to avoid triangles in modeling. Until now Tri-patches were always created from triangles. Optionally, Tri-patches can now be generated from quadrangles, if the number of subdivisions is even.
MultiPatch symmetry
The MultiPatch object has been enhanced by a symmetry option. The benefit in comparison to the symmetry object is that the symmetry is applied before generating the outer edge profiles. Thus, there are no problems with edge profiles at the mirror plane.
New parameter for edge profile
The U profile of the outer edges has been enhanced by the parameter "Length". It is used to extend the inner part of the "U".
Integrated help system
The context sensitive help is now available via the plug-ins menu und is displayed in a window within Cinema 4D.

| Version | 3.04.0 |
| System Requirements | Windows, macOS
Cinema 4D R17-R26, 2023 |
| Price | € 74.79 $ 84.81 (excl. VAT) |